Extender manual
Thank you for purchasing the looko2 extender with measurement of temperature, air humidity and atmospheric pressure.
Sensor configuration:
1. After connecting the sensor to the network, wait 2 minutes and search for a WiFi network o
name LOOKO2E_XXXXXXXX where XXXXXXXX is the unique number of the Extender
2. After connecting to the above-mentioned network, open a web browser and in
Enter 192.168.4.1 in the address field and press Enter
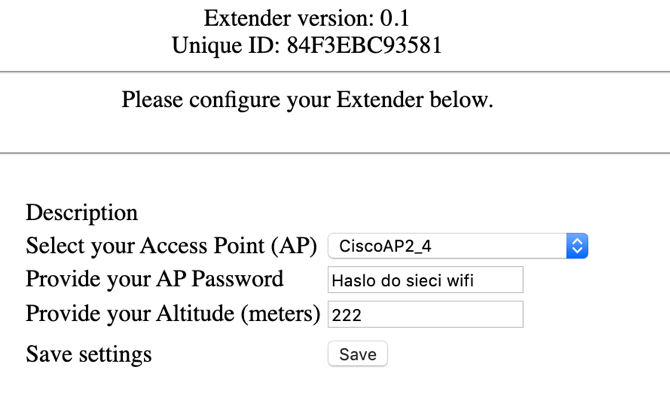
3. A configuration screen should appear:

Please write down the Unique ID number: XXXXXXXXX
Select your Access Point (AP) – please select the WiFi network to which the sensor will be connected
Provide your AP Password – please provide the password for the WiFi network
Provide your Altitude –please enter the altitude above sea level so that the sensor can display corrected pressure values. Leaving this field blank or with a value of zero will cause the sensor to read sea level pressure.
After entering the above-mentioned parameters, please press the Save button
The following message will appear:
Saving …
Saving OK, rebooting
To display sensor data, please use the following format:
http://ext.looko2.com/show.php?id=XXXXXXX
Where XXXXXXX is the sensor number that we asked to write down at the beginning of the configuration screen.
The readings will appear up to 5 minutes in the following format:

Resetting the sensors:
In case you need to reset the WiFi settings of the sensor (e.g. when changing
location, connection to another WiFi network, etc.), proceed as follows
procedure:
1.Prepare the ID of the sensor you are going to reset
2. Disconnect the sensor from the power supply for 30 seconds
3. Connect the sensor to the power supply. From then on, you have 90 seconds to
reset settings. After 90 seconds, the device will go into continuous operation and
it will be necessary to restart the reset procedure from step 1 of this
procedures
4. Select the WiFi network in the name of which there is the sensor ID that you want to reset
5. After connecting to the above-mentioned WiFi network, open the browser and enter 192.168.4.1/reset
6. Correctly performed reset of settings will be confirmed by a message
Config reset completed ok.
7. To reset another sensor, repeat the reset procedure by selecting from the list
another sensor
8. After a correctly performed reset procedure, wait 90 seconds and you can
proceed to reconfiguring the device.