LookO2 V4 Sensor Manual
Thank you for purchasing LookO2 V4 Air Quality Sensor.
Setup
Before you start configuring your new LookO2 sensor – prepare:
- your home wifi name and password
- GPS coordinates where the Sensor will be installed. It is necessary to enter them during configuration phase. You can find GPS coordinates using Google Maps. Just click on the street/address where the sensor will be installed and at the bottom of the page – Google Maps should show you coordinates.

In the example presented above you can see Latitude (50.010862) and Longitude (20.116497). This is the format you need during further configuration of LookO2 sensor.
Configuration
We strongly suggest you configure your sensor close to your home wireless router. Once configuration is complete – you will be able to unplug it and install in (for ex.) outside.
Plug in your device into power outlet. If you’re outside of EU – you may need proper adapter (not included). Sensor requires USB-C 5V – look around your house – you may find existing charger sitting somewhere in your drawer.
Once turned on – Sensor will start (LEDs blinking green) and wait for configuration (LEDs blinking white).
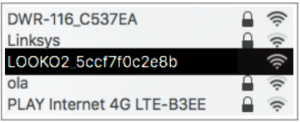
On your laptop or desktop computer – search for wireless network named LOOKO2_ZZZZZ (where ZZZZ is your unique sensor number).
Connect to this network. When asked for WiFi password – use the one provided on the orange sticker (Wifi/Panel pass:)
Example:
Once connected – open your web browser and type following address:
192.168.4.1 and press Enter/Return

You should see following webpage with “You are not logged in” info.

Click on logged in link.
New page will open asking you to provide password. Use the same password you used to connect to sensor’s wifi (the one from orange sticker)
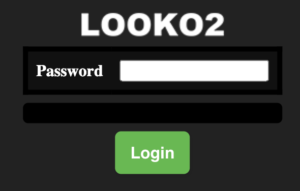
Click on Login button.
Next, you should see configuration page similar to example provided below:
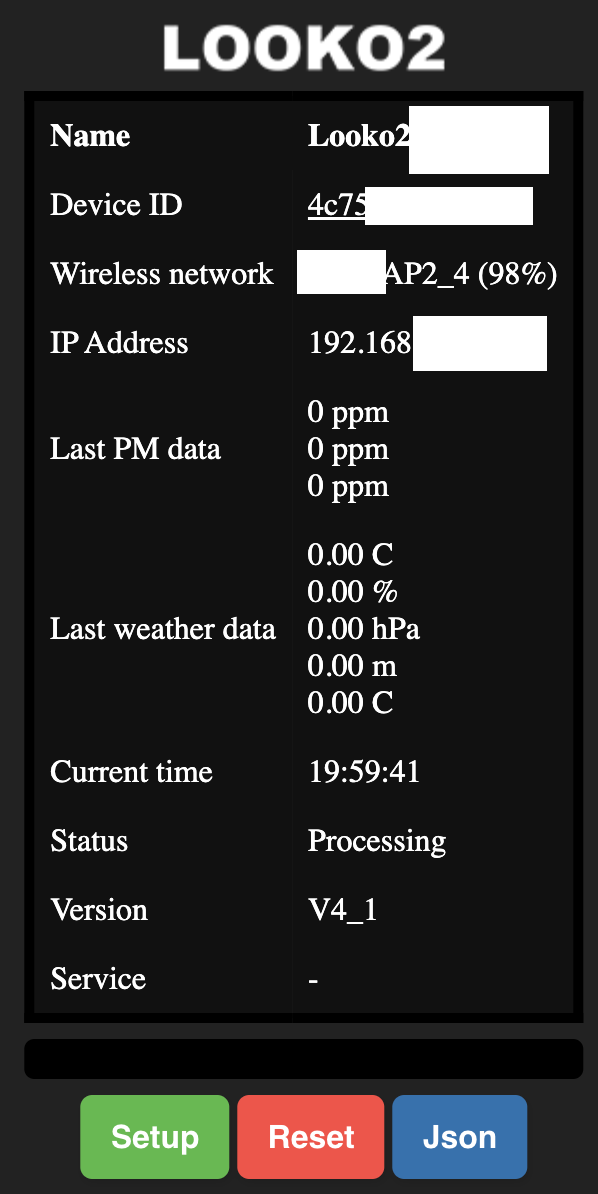
This is summary page – displays few important information about your sensor.
Name – Current (factory) name of your sensor. In next step – you will be able to change it.
Device ID – this is ID of your LookO2 sensor.
Wireless network: Initial setup shows no info or (100%).
IP address: Empty – sensor is not connected to your WiFi yet.
Last PM data: Sensor show current PM1, PM2.5, PM10 values directly from laser measurement.
Last weather data: Only for LookO2 V4T, V4F – shows readout from additional built-in sensors. For standard version (V4) – it will show “0”.
Current time: Shows current time (GMT) – before full configuration – this is internal info only.
Status: Waiting or Processing
Version: Software version of the sensor
Service: Informs if sensor requires service. Not implemented yet.
Setup button – next step – configuration
Reset button – resetting device to factory defaults
JSON button – JSON readouts for more advanced users
Please press SETUP button
You should see following/similar screen:
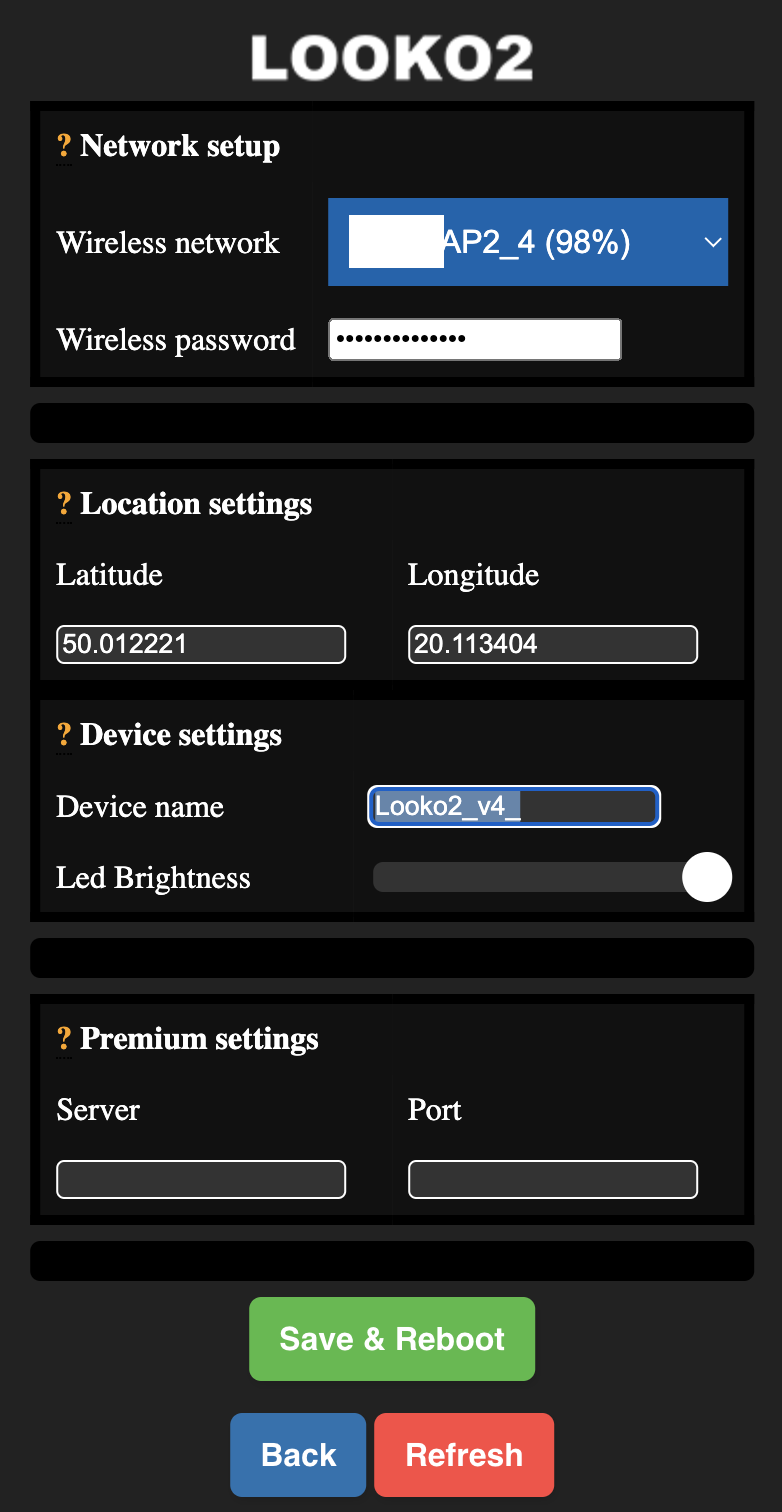
From the scroll down menu at the top (Wireless network) select your home network. If you cannot see your wifi network – press Refresh button at the bottom of the page. If you still cannot see your home network – get closer to your router. Remember that LookO2 V4 works with WiFi 2.4Ghz only.
In the Wireless password field – type your home wifi password.
Next fields are Latitude and Longitude.
Provide GPS coordinates that corresponds to location where sensor will be installed.
Device name: Enter new name for your LookO2 Sensor. This name will be displayed on LookO2 map. Please do not use special characters such as &^%$.. etc. Do not use space. Instead use “_”.
LED Brightness – slide from zero (left) to max (right) – to set the brightness of LED light. LED lights shows air quality (for ex. green – very good, orange – low, red – bad). If you set slider to left side – you will not be able to see any LED air quality color. We suggest leaving it as is. (can be changed later)
Premium services – Leave empty
After you fill in all necessary data press Save & Reboot. Device will save all settings and reboot itself.
You will see confirmation: Settings saved, rebooting
Leave sensor for 3 minutes now. It will try to connect to your wifi and send data to server.
After around 3 minutes built in LEDs should turn blue or green or red, etc (see what they mean below). It should not blink anymore.
If your sensor keeps blinking (after 3 minutes) and do not glow – read what it means DIAGNOSTICS part of this manual.
Once all is setup correctly and sensor is working properly – LED should constantly glow in one of below colors:
Blue means perfect air quality
Green means very good air quality
Yellow means average air quality
Orange means poor air quality
Red means bad air quality
Dark RED means very bad air quality
Short white flash of LEDs means – sending data to LookO2 servers.
Your sensor is ready to use – configuration is complete. You can unplug your sensor and install it outside – make sure that sensor is in good or very good wireless range. When installing your sensor outside – make sure intake and cable wholes are facing down. Otherwise – water (rain, etc) will get inside the sensor and permanently damage it.
Diagnostics:
Your sensor informs you about encountered problems using it’s build LED. Whenever there is a problem LEDs will FLASH. Each color means something different.
Flashing RED – Cannot connect to specified wifi network (no wifi network around, wrong password or selected WiFi is not 2.4 Ghz). Sensor may be too far away from your home router.
Flashing Yellow – succesfully connected but cannot access Internet
Flashing Green – sensor is rebooting
Flashing White – sensor has been reseted and is waiting for configuration
How to reset device to factory defaults
In case reset to factory settings is needed locate reset button – next to it’s power connector.
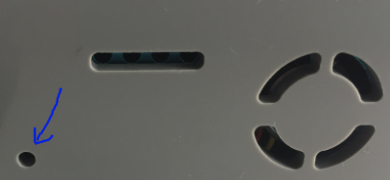
- Make sure sensor is turned on and NOT flashing
- Use plastic pin to push button that is hidden in the reset hole. No need to keep it – one click is enough
- Once succesfully rebooted – sensor’s LEDs will keep flashing white again
Sensor is ready for configuration.
Advanced user:
Your sensor supports additional features that are described below.
- Once properly configured and working – LookO2 sensor is available in your home network. You can access it by opening web browser and typing in it’s IP address. If you do not know what is the IP address – you should check what address it got from your home router.
- To access the LookO2’s website – use password provided with sensor. It is the same password that you used during configuration to connect to sensor’s WiFi.
- You can change LED brightness settings, again. After you’re done – hit Save and Reboot button.
- On configuration page – you will see WiFi strenght also. This will allow you to troubleshoot your wifi range – especially if you’re planning to install sensor outside – far from your wireless router.
In case of additional questions – feel free to reach us: kontakt@looko2.com